- To access your checklists, click on the Checklist icon on the sidebar
- To create a new checklist, click on the ‘+’ icon in the top left corner of the grid
- Choose New Checklist
Below is a short video showing the listed steps:
Now, there are three important steps in creating your checklist:
- Setting the schedule
- Adding Tasks
- Creating assignment rules
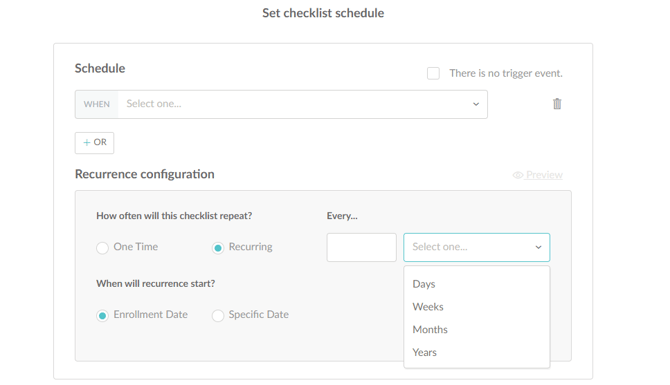
Setting the schedule
A checklist's schedule is determined by two things:
- The trigger - the action that initiates checklist task assignment
- The recurring frequency - how often will checklist tasks be (re)assigned
Some of the available triggers are listed below:
- Triggers based on employment status changes (pre-hiring, hiring, rehiring or terminating an employee)
- Triggers based on job detail updates (change of manager, position, department, location, division, salary, employment type, etc.)
- Fixed (specific) date triggers
- No trigger event - a no trigger checklist is particularly useful for creating a set of tasks that you will assign manually once the time comes
After selecting a trigger event, you can also customize the recurring frequency of the checklist if necessary.
Adding Tasks
To add a task to a checklist, click on the Add Task button and then choose one of the different types of tasks available.
You can choose to add an existing task from the library (it will list all active checklist tasks) or create a new task. While creating a new task, fill in the details of the task depending on the selected type of task.
After you have added your tasks you can customize the list by moving or deleting them and then saving your changes. These actions are shown in the video below:
Creating assignment rules
Assignment rules are used to specify your target assignees.
You can choose to assign tasks to all employees or a selected group of employees by choosing any of the following parameters:
- Department
- Division
- Employment Status
- Employment Type
- Location
- Manager
- Pay Rate
- Position
- Security Role
- Specific Employee

For example, if you set your checklist schedule to be triggered when an Employee is hired and if you choose the Position parameter to be Translator, it would mean that the checklist will be activated for all hired translators.
Please note that this list of parameters can be extended if required. Contact us at support@hrcloud.com for more details on adding new parameters to this list.
Summary
Your checklist settings will appear on the right side of the Checklist builder view so you can easily review if everything is set up properly.
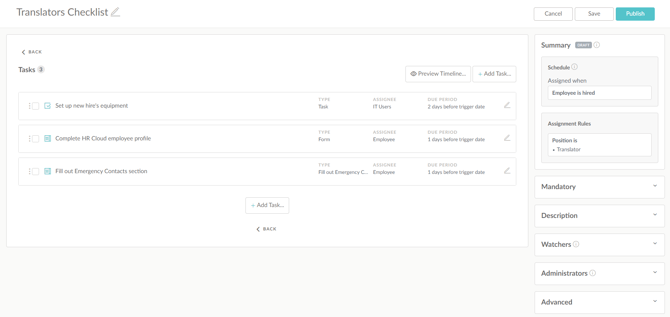
Finally, all you need to do is:
- Name your checklist in the upper left corner.
- Set the checklist as Mandatory, if needed.
- Add a Description.
- Set up checklist Watchers, if needed.
- Choose checklist Administrators. Those specified as administrators will be able to edit the checklist. Please note that HR admins will, by default, have edit permissions for all the checklists in the system.
- Under Advanced you can:
- set Checklist priority which organizes your checklist list by priority
- define Task Library Visibility to determine who will be able to see the tasks in the task library
- define Access and Visibility settings
Once the checklist is built you can activate or deactivate it, edit, duplicate, or delete it all from one place: